Showing posts with label Fairy. Show all posts

Monday, 30 September 2013

clothes pin fairy


It was my daughter's birthday party recently and we made a simple craft with the girls, a fairy.

Here is a list of the supplies I used:
  • clothes pin
  • double sided tape (to glue everything - almost)
  • felt (wings)
  • markers, fine tip (black and red)
  • paint  (body)
  • pipe cleaner (arms)
  • ribbon (belt)
  • tissue paper (skirt)
  • wool (for hair)

Here is how I made them:
  1. Paint clothes pin just below the pin or head, this will be the top of the fairy. I also painted the bottom tips of the clothes pin for shoes but you can't see that in the photo.
  2. Cut a piece of tissue paper approximately 10" x 4", fold in half to create a long strip. Scrunch/gather. Glue/tape around waist of fairy.
  3. Cut a piece of decorative ribbon slightly longer than what will fit around the fairy's waist, you want it to overlap slightly. Glue/tape into place.
  4. Use a pipe cleaner approximately 6" in length, fold ends of pipe cleaner to create the hands.  Fold in half and glue/tape to the back of the fairy with the arms coming forward.
  5. Cut some wings out of felt, I just folded a piece in half to cut both sides at the same time and guessed on how it should be. Glue to back of fairy, covering the arms and back of the belt.
  6. Cut some pieces of wool approximately 10" long, tie into a knot in the middle. Glue/tape on top of head. You may need to give your fairy a hair cut but that is completely up to you.
  7. Draw the eyes and lips and now you are done.
You could always add a decorative ribbon to the back so that you can hang the fairy up, we just did not get to doing that this time around....maybe next time.

Monday, 23 September 2013

a fairy garden party

It was my daughter's 4th birthday so we had a fairy garden party with a special guest...Tinkerbell.  You can see more of Tinkerbell here.  It as so much fun to decorate for this party. We scattered flowers on the table with a few leaves here and there, very whimsical I thought.


I had asked my Mom to keep an eye out for one of those glass domes on a pedistal and here it is filled with cupcakes and butterflies. I made coconut cupcakes (recipe found here) and I think I have found a new favourite, it was so yummy. Then topped with some cream cheese icing.


Some flower and leaf shaped cookies (recipe found here) decorated with royal icing. These by far are my favourite go to sugar recipe.


And it seems I can not do a birthday without cake pops. I used a poppy seed sour cream cake for the cakes and then covered them with Wilton candy melts and green royal icing swirls...how cute are these?

I had seen this idea on Pinterest (not sure if I love Pinterest or strongly dislike it) and thought it was a fun idea. You take Wilton candy melts and dip the cup into it then dip the cup into coloured sugar. You can find the tutorial I used here. On these cups I also added some washi tape and a sticker to make these plain cups a bit more interesting.  Now add a paper straw and you are done.


All the little fairies got a braided headband made out of tulle. I wove a flower into it so it looked more fairy like.  I used 9 pieces of tulle (white and purple sparkle mixed) to make the headband. There was a tail (can't see it in the photo) that is about 12-15" long and I added a pink ribbon and bow as well.


I felt that the boys needed something different so I made them a Peter Pan hat.  I used this tutorial, it was very simple to make. 

If you look closely, you can see that the fork has been decorated too...yes, I got carried away with my glue gun. I bought clear forks, tied a ribbon around it and then glued some flowers on top of the ribbon. I loved how it looked and I will do a variation of this next time too.  The paper plates were plain white and I gathered some crepe paper (rolls that you easily find at a local dollar store) and then glued it to the back of the plate...simple but whimsical.


And finally the cake. I try to not make a cake and do cupcakes instead but my daughter really wanted a cake, so I made her one. Cake decorating is really not my thing, it's a skill that I have not fine tuned but having said that I am quite happy with how the cake turned out. There was 2 layers of cake, one green and the other purple, and cream cheese icing and raspberry jam in the middle.


Monday, 13 August 2012

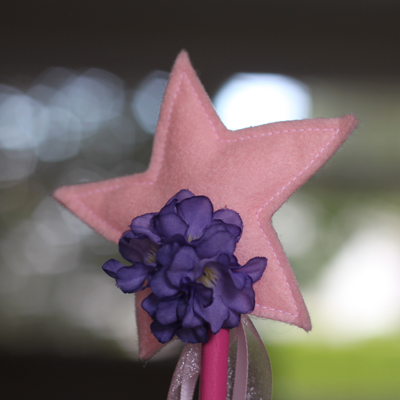
fairy princess wand


My daughter is in love with pink and purple, fairies and princesses. So, for her birthday we are planning to have a pink lemonade fairy princess party. I thought it would be fun to make some little wands for the kids to take home as their party favour.  Her is a sneak peak of what I've been working on. I think I may add a flower or two with the star, I always think of beautiful flowers when I think of fairies. We will see what the finished wand will look like. I will post photos after the party.


Here is what the wand handle looks like, complete with a few Swarovski crystals.


Here is how I made the wands:
  • cut 5/16" dowel (this was the smallest I could find that was strong at the same time) to 12" lengths.  I purchased my dowels at the hardware store.
  • add a handle (optional).  I got these from my father, he was planning to get rid of them.
  • painted dowel and handle with craft acrylic paint.
  • decorated handle with white paint.
  • added a finish coat of mod podge matte.
  • cut 2 ribbons 24" +/- long, folded it in half and used a hand stapler to attach to top of wand.
  • sewed together 2 stairs leaving an opening at the bottom of the star where the dowel would go.
  • stuffed the star slightly then put onto the wand and use a staple to secure in place. 
  • decorate the stars to your liking...make sure you cover up the staple (I have yet to do this part)